≡ Menu

Pumpkin-Chocolate Chip Ring

On Sunday, D and I are hosting thirty-ish people for a housewarming. Our freezer is full to the top spinach-feta filo pies, tartlets and muffins, all shaped like my one tartlet pan. I’m making a meringue pavlova tomorrow, but I wanted another dessert, and I can’t make any more tartlet-shaped things or my house will become one big tartlet. Enter David Lebovitz — acclaimed chef, lucky Parisian, and expert food blogger. His pumpkin-chocolate chip ring recipe looked tasty, but I had no applesauce or orange juice in my fridge. I did, however, have some homemade yogurt (thanks to my new Salton yogurt maker). So I took David’s recipe and messed around with it a little, substituting yogurt for the applesauce and orange juice, altering some other proportions slightly, and doubling the recipe. I also added some toffee bits, which practically melt into the cake while it bakes. The result is an incredibly light yet moist cake that tastes rich with pumpkin and chocolate but won’t break your calorie bank. I’ll most definitely be making this again.

Here’s my one confession about the recipe: David Lebovitz is a professional. He used to be the pastry chef at The French Laundry, an acclaimed restaurant, and has written several fantastic cookbooks (including The Perfect Scoop, which has the best ice cream recipes EVER.) The point is, being a pastry chef means that he’s very precise in his instructions, and I’m sure he’s right that following those instructions will yield a better, lighter cake. having said that, I didn’t follow any of his instructions (see all my asterisked notes throughout) and my cake came out fine. Do as you please….but I’m telling you, my “wrong” way works, too.

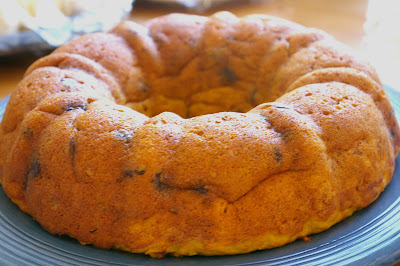
Pumpkin Chocolate Chip Ring
adapted from David Lebovitz.
serves 10-12

2 1/2 cups whole wheat flour
1 tsp baking soda
1/2 tsp cinnamon
1/2 tsp. nutmeg
1/3 cup chocolate chips

1 1/3 cups canned pumpkin
2 cups plain yogurt or sour cream
2/3 cup brown sugar
2 large eggs
1/4 cup vegetable oil
1 teaspoons vanilla

1. Position a rack in the center of the oven and preheat to 350 degrees.
2. Mix together dry ingredients in a medium bowl and set aside.
3. In another bowl, mix together the wet ingredients and blend with a mixer on high until frothy, 1-2 minutes.*
4. Make a well in the center of the dry ingredients and add the wet ingredients. Stir together JUST UNTIL MIXED and add the chocolate chips. DO NOT OVERMIX.**
5. Grease a non-stick ring pan. If using a regular ring pan, grease and flour to ensure that the cake comes out cleanly. Spread the batter into the pan (and as usual, other pans will work — the ring does look pretty, though.) David says “spread using a gentle touch.”
6. Bake until top of the cake springs back when touched, about 40-42 minutes depending on your oven. DO NOT OVERBAKE.
7. Let cool on a wire cake rack, then invert. Let cool completely, then sprinkle with powdered sugar.
*I didn’t use a hand mixer — I just whisked the wet ingredients with a fork for a minute or two, until well mixed and light.
** I committed the sin of adding dry to wet — and my cake still came out light and fluffy.

**Note: I’ve gotten a couple questions about how to make this pareve (non-dairy). The answer: subsitute David Lebovitz’s wet ingredients for mine:

1/3 cup plus 1 tablespoon canned pumpkin
1/4 cup unsweetened applesauce
grated zest of 1 orange
1/4 cup fresh orange juice or water
3 tablespoons packed dark brown sugar
1 large egg 1
1/2 cup vegetable oil
1 teaspoon vanilla extract

The instructions in this recipe are the same for a pareve version of this cake, as they’re mostly taken from Monsieur Lebovitz himself.

{ 2 comments }

Not Derby Pie Recipe

One Friday night many years ago, this dish landed on my dining room table. Being the ever-obnoxious 9-year-old that I was, I immediately spat, “what’s that?”
“Not Derby Pie.”
Not Derby Pie?”
“yep.”
“Well if it’s not Derby Pie, then what is it?” and, after a moment’s hesitation, “what is Derby Pie, anyway?”
My mother laughed, as she often does — then told me to just try it already.

The backstory: Derby Pie® is the exclusive product (and name) of Kern’s Kitchen. According to their website, “Derby Pie® was born nearly a half century ago as the specialty pastry of the Melrose Inn, at Prospect, Kentucky. Once developed, a proper name had to be given. Because each family member had a favorite, the name DERBY-PIE® was actually pulled from a hat.” While I’ve never had the original, the concept of the pie is genius. A deep-dish pie shell is sprinkled generously with chocolate chips, then loaded to the top with nutty nougat filling and baked just until set. What more can a pie-lover want?

In 1982, in an article by Phyllis Richman profiling Kern’s Kitchen, The Washington Post featured a recipe for Not Derby Pie. My mom took hold of this recipe and never let go — she made it very often and it was an instant hit among friends. Admittedly, I was a nut-hater at the time, and the pie didn’t much strike my fancy. I did, however, manage to eat the entire bottom layer of two slices and pick through the nougat a bit before calling it quits. Once I discovered how fantastic nuts are, this pie quickly climbed high on my favorites list. It’s one of my go-to recipes for Friday night dinner parties, and an unfailing success.

Not Derby Pie (adapted from the Washington Post)
serves 8-10.

1 pie crust or graham cracker crust
1 stick margarine or butter
1 cup sugar
2 eggs
1 tsp vanilla
2/3 cup flour
1 cup chopped or ground walnuts
1 cup chocolate chips

1. Combine sugar, eggs, vanilla, and flour; mix until ingredients are incorporated.

2. Melt butter, and allow it to cool a bit; pour butter into mixed ingredients very slowly. Mix to combine. Add nuts and stir just until incorporated.

3. Sprinkle chips into the bottom of the pie crust. Pour mixture over.

Bake at 325 degrees for 1 hour.

…really, that’s it.

{ 2 comments }

Asian Cabbage Salad

I promise lots of posts this week with various recipes and pics from our housewarming, but this recipe was requested multiple times tonight with varying degrees of urgency, so it gets first attention. My mom and I first encountered this salad at a potluck. One of the guests showed up with four ziploc bags, and in a matter of minutes had a beautiful salad ready to go. Naturally, we went home and attempted to copy the fantastically sweet and tangy dressing for our own cabbage slaw. After a little tinkering, my we got it just right. Ever since then, it’s been a family favorite. I’ve been known to devour this salad whenever it’s in the fridge — and that’s pretty often, considering my mom always keeps around tupperwares of toasted “crunchies,” dressing and the other ingredients. This will soon become a staple in your house — and it’s quick to prepare. I should add that this salad will welcome whatever you toss its way: yesterday, I had leftover chopped and spiced water chestnuts, carrots and fennel from some Asian dumplings I had made, so I added them to the salad and they worked quite nicely.

Asian Cabbage Salad
serves 6-8.

salad:
1 bag sliced cabbage or 2 small heads of cabbage, one green and one purple sliced thinly
2 scallions, washed and slivered
1 can mandarin oranges
1 avocado, sliced (optional)

crunchies:
1 bag instant ramen, broken up into small pieces
1/3 cup sliced or slivered almonds or pine nuts
1/4 cup sesame seeds

dressing:
1/4 cup soy sauce
1/2 cup apple cider vinegar
1/4 cup brown sugar
several dashes sesame oil

1. Preheat over to 300 degrees. Put ramen noodles, nuts and sesame seeds onto a baking sheet in a single layer. Bake 10-15 minutes, or until ramen are golden. Cool completely.

2. Toss all vegetables in a large salad bowl.

3. Combine dressing ingredients in a small bowl and whisk with a fork.

4. Toss together shortly before serving. Noodles will gradually get soggy, so the sooner served, the better.

{ 4 comments }

Etrog Marmalade

from the archive.

It’s the last day of sukkot. Your lulav is on the table getting brown, and your etrog is still in the fridge, getting dry. Same story, every year: what on earth are you going to do with a palm branch, some willow and myrtle leaves, and a fruit that really doesn’t have all that much fruit inside? My answer is usually…uh…throw them away? I know, you’re not supposed to. If you have a better suggestion…

Leave it to my mother to be creative; that’s really her forte. She’s been using the etrog in her Thanksgiving cranberry sauce for years now, and a few years back she started making marmalade. Now she doesn’t go to all the trouble of soaking jars in a hot water bath, sealing them professionally and destroying any possibilities that bacteria will sneak in and give all of us botulism — but hey, these marmalades aren’t around for long enough that we really have to worry about it. Her no-nonsense packaging solution is mini tupperware containers. They stay just fine in the fridge until Passover, and by then my dad makes sure to finish them off.


[click to continue…]

{ 4 comments }

The Friday Night Conundrum

You and I know how hard it is to get a meal on the table Friday night (let alone Saturday morning) that’s well-cooked but not over-cooked, tasty and colorful, and not entirely dried out after a long tenure on the blech. It’s not easy! In honor of these hardships, here’s a laundry list of questions from my dear friend Sarah about how, exactly, to coordinate a Friday night dinner service….and my answers.

Sarah: I need some food related advice. I’m making Shabbat dinner for friends on Friday. I have the day off on Friday but have a 3pm doctors appt that will make the afternoon kind of rushed and give me only an hour to cook. I’m making zucchini and pumpkin muffins before hand and roasting squash and potatoes (your recipe!) beforehand too and just reheating. Is that a bad idea?

The main dish is terriyaki salmon. Was just going to Marinate and broil… but then I realized I really dont know hot to broil! How long do you leave it in for and do you leave the door ajar? You rock.. thank you!

-Stumped in Seattle

Rivka: Sarah you rock! Ok… in answer to your qs:

muffins are a perfect idea! The potatoes should also hold up really nicely; you might stick them in the oven just before you leave for the dr, so that by the time you return they’ll have been in for a good two-ish hours. If you’re using small potatoes, this is more than enough. If you’re using large ones, you can leave them in for a bit longer. In any event, the reheating should be fine. Just check their moisture level when you’re about to stick them back in the oven; if they’re a bit dry, add a splash of olive oil and a splash of water or stock and reheat covered for a few minutes, then finish uncovered; if they’re soft, crisp them by reheating without a cover.

Squash will also keep very well. If you’re doing delicata, make sure you only par-cook it in advance (say about 15-20 minutes) so that your re-heat won’t overcook the squash. Butternut, acorn and other winter squash varieties will withstand a reheat without getting mushy.

Teriyaki salmon — yum! Broiling can happen two ways: some ovens actually have a broiler, usually found beneath the regular oven. To use this, turn your oven on broil and when it’s nice and hot, stick your salmon inside. My broiler has a metal tray with three shelf heights, and I use the second from the top for fish. If your oven doesn’t have a broiler, just turn the knob to broil, put your fish on the highest rung in your oven, and yes — leave the door ajar. This allows the steam to escape so that you achieve the crispy crust of a good broil. Baste the fish at least once in the middle of the broil. Also, a note on reheating — make sure that you don’t overdo it, so that it doesn’t dry out when you reheat it. I’d estimate about 10 minutes per inch of fillet. My fillets are usually an inch and a half at their thickest. I’d say broil it for 10-12 minutes, then check for doneness. You don’t want it to be raw inside, but if the very center is a bit underdone, you can finish cooking it during the reheat.

I want to be at your Friday night table! 🙂

Happy cooking and coordinating and chowing…it’s a delicate dance, indeed.

{ 0 comments }

Chicken Cholent

I think I officially have enough blog traffic that my Jewish friends aren’t the only ones reading! This means that I actually have to explain what cholent is. (This is very exciting.)
Cholent is what Ashkenazi Jews (from Eastern Europe) used to eat every Saturday for lunch. Sephardi Jews ate something similar, but they called it “Hamin” (which means “hot stuff” in Hebrew…funny, no?) We still make this today, and to my knowledge, little has changed in terms of the basic ingredients — though every cook adds his or her special touch.
The key to cholent is cooking time. Because traditionally, no cooking is allowed on the Sabbath, people start cooking cholent by sundown Friday, and don’t touch it until they’re ready to eat it on Saturday for lunch. By Saturday afternoon, the watery, murkey pot-o-goodies is an entirely different animal: the barley has soaked up all the water and turned soft and supple; the meat (or, as here, chicken), having been braised for about 18 hours, falls off the bone unprodded. Potatoes have turned dark brown from steeping in chicken stock and whatever else is in the pot — and the marrow in the bones is creamy, flavorful and delicious. Sound appealing?
Over the years, the basics of cholent have stayed the same (meat, potatoes, barley), but the little things change from chef to chef (and, in my case, from time to time). I find that meat sits in my stomach like a brick when I eat it on Saturday afternoon, so my new thing is subsituting chicken. Sometimes I add apricots and carrots, sometimes prunes or dates. Once I even did a tagine style and included preserved lemons. As for the liquid, I frequently add chili sauce or bbq sauce, which are both pretty common — but anything will do.
The best part about cholent is that it only improves with age; leftovers are even thicker and more flavorful. I’ve included a recipe below, but that’s really not necessary, for two reasons:
a) cholent is a method, not a recipe. Just throw some protein and carbs in a pot, cover with liquid, and cook forever.
b) my actual cholent recipe is someone else’s prized posession, and it was given to me on strict condition that I never write it down, let alone pass it on. I wasn’t even allowed to transcribe it as I heard the holy words uttered; I merely had to remember it as best I could, and try to replicate the recipe according to my (very flawed, very human) memory. You may not be surprised to know that he who gave me this recipe actually called it “Torah She-B’al Peh,” or “Oral Law.”
So that’s that.
Cholent
serves lots.
1 whole chicken or many strips of flank steak
several potatoes or any kind, washed and quartered
a few cups of barley
a couple marrow bones, optional
salt and pepper
any or all of the following things and more: carrots, apricots, prunes, dates, raisins, gosh I don’t know — preserved lemons, olives, tomatoes, you name it.
Dump all this in the crock pot.
Cover with water by at least a couple inches or more.
Add any or all of the following sauces, if you wish: bbq, teriyaki, sweet chili sauce, tomato sauce, soy sauce, etc.
Turn on high until boiling, then switch to low and leave it alone until ready to eat!
I should mention one note: some people stick balls of tinfoil between the actual crock pot and the heating device in which it sits, so as to avoid the burnt crust that forms at the bottom of the pot. I like burnt, so I leave well enough alone.
Happy Cholent!
{ 0 comments }

how to temper chocolate

People, I couldn’t have said this better myself. Watch this video on Chowhound for thorough and user-friendly instructions on how to achieve that glossy coat of chocolate deliciousness that hugs strawberries, almonds, candybars and more. Then go out and buy yourself a candy thermometer: I did this last week, and it cost me a grand total of…3 bucks. Do it! Precision is key in tempering chocolate, and you can’t be precise without a thermometer. The results, which I will post as soon as I temper some chocolate, are well worth the effort.

{ 0 comments }

The easiest cake ever

Many thanks to Elena, who gave this recipe to my mom, who practically forced me to make it. This cake is deceiving: its ingredient list and instructions are so short and sweet, you could make it blindfolded. But don’t let the ease deceive you; this cake is definitely better than the sum of its parts. Throw the ingredients in a bowl, mix (by hand!), chop the fruit, throw it all into a springform (or regular pan), bake, and voila, a perfect dessert is yours.

Make sure your fruit are ripe; this will really add to the overall flavor and moistness of the cake. Also, as this recipe is so darn basic, feel free to improvise! Here are my favorite variations:

-pears, lots and lots of pears
-plums and peaches
-blueberries and pears
-raspberries
-raspberries and peaches

You get the drift — do whatever you like. One last note: I tend to arrange sliced fruit on the bottom of the springform, so that when I turn the cooled cake onto a serving platter, the bottom (now the top) looks pretty. This is entirely optional. In fact, I didn’t do it this time because my pears were very ripe, and too delicate to mess around with. If you’re using a regular, non-springform pan, you can do as my mother does, and arrange fruit on top of the batter. They will sink in a little as the cake bakes, but you’ll still be able to see them.


The Easiest Cake Ever
serves 8-12.

1 cup flour
3/4 cup sugar
2 eggs
1/2 cup canola oil
1 tspoon baking powder
1 tspoon vanilla
zest of 1 lemon
3 cups of fruit, any variety, but soft and juicy!

Combine all the above ingredients, reserving 1 cup of the sliced fruit.

Grease and flour a 9″ round or rectangular baking pan or springform pan.

At this point, EITHER:
1) pour in batter and add the last cup of fruit on top OR
2) arrange the remaining sliced fruit in spiral design in the springform, and pour batter overtop.

I sometimes sprinkle a bit of sugar ontop for a crunchy crust.

Bake at 350 degrees for 1 hour.

I often serve this cake with a fruit sauce or reduction; it’s pictured here with quince sauce, and I’ll post that recipe soon.

{ 3 comments }