≡ Menu

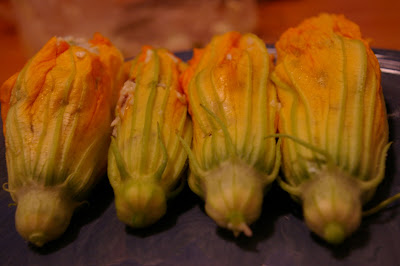
Being that it’s summer and zucchini is in abundance, these little numbers have been popping up all over the place. I’ve been wanting to make these for quite some time now, but hadn’t quite settled on a recipe for the filling. I’ve seen any number of variations, from plain white or cotija cheese to corn-laced ricotta to bread crumbs and monterey jack, but none quite fit my bill. I wanted a mix of vegetables, cheese and non-cheese protein (but since I keep kosher, I couldn’t use meat). So ever since my Sunday trip to the farmers’ market at Dupont Circle, the blossoms have been sitting untouched in my fridge.

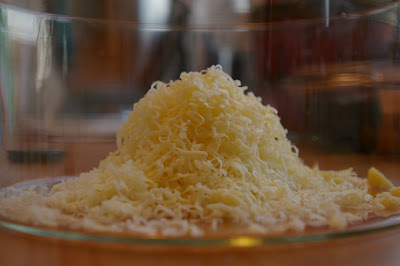
When I got home last night and opened the fridge, there they were, staring at me. That was it, I decided. These babies won’t last forever anyway — might as well make use of them before they wilt and I lose my chance. I had a nice hunk of sweet ricotta in my fridge, and I decided to pair it with with some good Vermont cheddar, which I grated into the ricotta.


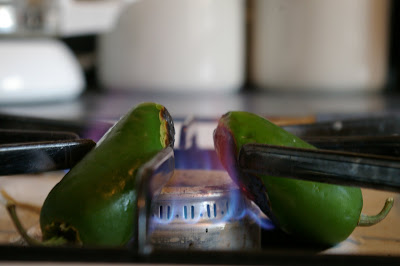
The other obvious inclusion was chili. I had two baby jalapeños, which I roasted over an open flame, steamed in a paper bag, and julienned.

Through the vegetable drawer I saw a couple baby squash that I had completely forgotten about; typical me. In keeping with that very trendy “____ two ways” concept, I decided to include the squash in my filling. But what else?

Enter Morningstar Farms, my best friend. Actually, we’re going steady. I have at least four of their products a day — two of the fake-bacon strips in the morning, and two of the sausage links sometime during the rest of the day. I’ve been addicted to these as long as I can remember, and the Safeway near my house has this automated coupon dispenser that coaxes you to try new things by giving you big coupons, then cutting the savings in half on your next coupon for the same item until you’re addicted to buying it, regular price, from now on. That’s how I got onto the bacon strips.

But I digress.

I actually thought that a somewhat spicy, smoky sausage would make a nice accompaniment to the richness of the cheese and bitter chili, and boy was I onto something, if I dare say so myself!

While I was sautéing the squash, I tossed in three sausage links. Once they had thawed, I roughly chopped them and tossed them, along with the squash, into the big cheese-chili bowl. I guess, in retrospect, I was also going for texture here, and the sausage added a much needed toothsome quality to the mixture. Did I really just use that word? That’s such a restaurant critic word … eek, sorry sorry.

So now I had an appetizing mush (if that makes any sense) of ricotta, cheddar, jalapeño, sautéed baby squash and fake sausage. mmmmm.

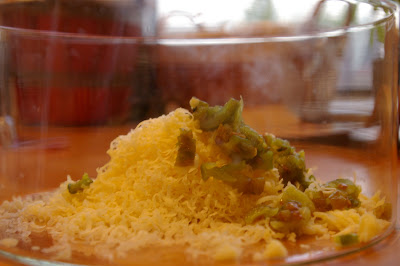
(Okay that pic is before I added the squash and sausage. Too much coordination required!)

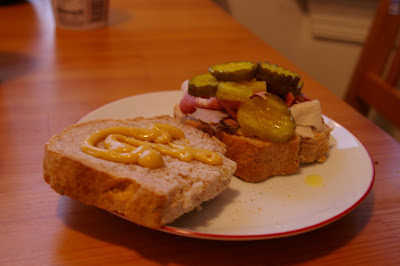
I guess it was about this point when D asked me what was for dinner. She’s got this skill of being totally not ready for dinner one second and being OH MY GOD FAMISHED the very next. By the time she’s asking what’s for dinner, she’s way beyond the point of hungry and just dying to put food in her mouth. This clearly doesn’t bode well for my cooking experiments, which take longer than, say, throwing together a deli sandwich.

…which is exactly what she did.

Now I was left with four squash blossoms, a bowl full of cheesy filling, half a pan of oil, and myself. Thank god I skipped the gym this morning. Wouldn’t want to compensate for the thousands of calories I was about to consume, not one little bit.

It’s a tough job, but someone’s gotta do it. I cleaned the little green bugs off the blossoms (yea, make sure you do that…), stuffed each one with a hefty amount of filling (do not be afraid to overstuff them), and twisted the ends together in a lame attempt to keep the filling inside.


Next, I dunked each one in a bowl of half-and-half, then rolled each in a mixture of flour, cornmeal, salt, and pepper. A quick bath into the deep-fryer (also known as my cast-iron skillet with an inch and a half of oil in it) and they’d be ready to eat….

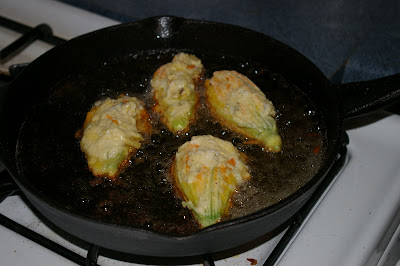
Which I dutifully did. What’s really nice about these is that if you like burnt things like I do, you can leave these in a little longer than a professional would, giving them a nice, crisp exterior and oozy, melty innards. Otherwise, leave them in the oil about 45 seconds per side, just until the flowers are warmed through.
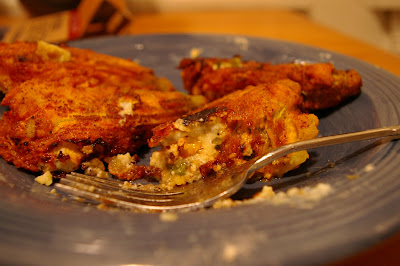

Bon appetit!

{ 0 comments }

Pesto, two ways

When I first learned to make pesto, it was “dump everything in the cuisinart and pulse.” I’m still of the philosophy that if you have good indregients, that method is just fine. However, when Heidi over at 101 cookbooks posted about making pesto like an Italian grandmother, I knew I’d have to try it the “proper” way at some point. (Her pics are beautiful…too bad I can’t say the same for my own; they really capture the dim lighting of a classic first apartment.) Heidi, thank you for inspiring amateurs like myself to try this technique!

The major difference between store-bought pesto and classic Italian pesto is texture. The bottled stuff spreads like a paste, whereas the more traditional, labor-intensive product is like a finely-chopped salsa (just, uh…more finely chopped). Without further ado, pesto:

Heidi says that a mezzaluna is the best tool for chopping. Alternatively, use a half-moon-shaped pizza slicer (or just make do with a good, big, sharp knife). In any event, plan on allotting about half an hour for all the chopping, since you’ll only be chopping a bit at a time.


As you’ll notice from my pictures, I actually tried this twice. The first time I used a silicon cutting mat and the traditional proportions: a bunch of fresh basil, a few cloves of garlic, a handful of pinenuts, and about a cup of parmigiano reggiano. I followed Heidi’s directions to first chop the basil and garlic, then add the pine nuts, then add the cheese. It worked quite nicely, though I added olive oil to the top to preserve it as she recommended, and I found that it made the pesto more oily than I had wanted it.


The second time, I used a wooden cutting board (smart Rivka, smart), varied the proportions a bit, and changed my technique as well. I made a pine nut-heavy pesto, as a compromise for D, who is not a basil lover (I know, I don’t get it either.) (Of course, I forgot that she also hates pine nuts. Silly me.) I also decided to chop the pine nuts and cheese before the basil and garlic, to see how it would change things. In the end…..the Italian Grandmother knows best. If you don’t start with the basil and garlic, they become very difficult to chop to the degree of fineness required. The nuts and cheese are much easier to incorporate into the basil and garlic than vice versa. Am I shocked that an Italian pro knows better than amateur me? no. Did I have to try just to make sure? apparently.

Pesto
One handful fresh basil
a few (2-4) cloves of garlic, to taste
heaping handful of pine nuts
scant cup Parmigiano Reggiano, grated fresh
good olive oil

Begin by chopping the basil and garlic together until fine.
Add pine nuts in two or three additions, chopping until the mix resembles a finely-chopped salsa.
Add cheese in two or three additions; I find that the cheese helps hold the pesto together, so that by the second addition of cheese, the ingredients start to become well-incorporated.
Pour some olive oil over the top (about 1/4 cup?) and continue chopping, until mixture can be combined into a block on the cutting board.

If you’re planning to use this later, pack it into a bowl or tupperware and cover with a generous layer of olive oil, which will prevent the basil from oxidizing and turning dark.

{ 0 comments }

Yummy pics from my travels….and welcome!

Really, those things are in reverse order: first, welcome to my new blog! After years of loyally reading and shamelessly admiring others’ food blogs, I’ve decided to join the fun. With absolutely no promises about what this blog will or won’t contain, my guess is that I’ll blog about anything and everything food-related, including but not limited to:

  • teaching D, my SO, to like food that isn’t Subway (or “subwayeatfresh,” as she affectionately calls it)
  • the good, bad and ugly of trying new restaurants
  • lots and lots and lots of home cooking and baking
  • the general rants on being a foodie with very few foodie friends

So start reading and don’t stop! Because the posts and laughs will keep coming as quickly as I can get a good bite to eat or put food on the table (and drag D away from her footlongs).

Now, for the pics I promised….

This one is from a delightful little chocolate shop in the Marais section of Paris. You’ll learn quickly that my total lack of self-control is mitigated only by my frequent trips to the gym. Put differently, I make up for all that running and lifting and pretty disgusting sweating by eating my way through hoards of chocolate, of all varieties. I would pretty much kill for a heath bar or skor bar; My food-illiterate friends think I’m a snob for liking toblerone, so when I splurge for the occasional bar of single-origin chocolate, it stays in my desk drawer at work. Plus, D would be horrified at the thought of wasting money that could otherwise buy…you guessed it.

On my last day in Paris, I ate at a bistro in the 5th Arr. called Le Petit Vatel. D and I both ordered this vegetable plate as our entrée. Jasmine rice sat beneath the veggies and sopped up the ample liquid from the carrots, zucchini, tomatoes and french lentils. Like many of the things we ate, this was remarkably simple, and absolutely delicious. As you can see, the whole thing is topped with some mysterious flowers. To this day, I don’t know what they are. I tried to ask the maître d, but she mumbled something in French. It was too quick to catch, and I didn’t want to be a nuisance. Boy, do I regret that. I’d ask three times if I could do it all over. must. have. me. some. of. those. flowers.

Fish market at closing time. Really there are more boxes than anything else — and this man sure looks like he wants to go home. He was just thrilled that wanted to take pictures. By thrilled I mean wildly entertained. By wildly entertained I mean ready to go home.

That’s all for now. Soon enough, I’ll make the pie for which this blog is named, and post about it. Until then, happy reading and thanks for checking out my blog!

{ 0 comments }

"Your hands are the best kitchen tool" — ha.

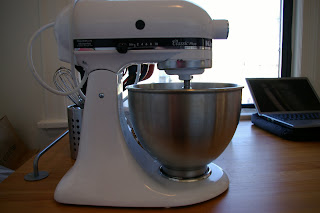
Imagine my surprise when, as I was leaving my parents’ house, I spotted a big, unmistakable box in their basement.

It most certainly wasn’t empty.

I knew my mom’s kitchenaid was upstairs (being used that very moment, in fact, to mix her challah dough), so this big box downstairs must contain…..another kitchenaid!

Indeed, after just one round of thinly-veiled pleading, my mom picked me up from the metro for a matinee performance, and insisted on driving me home afterward, new toy in tow. Needless to say, as soon as I got home, I popped this baby out of the box and took it for a test drive.

It’s everything I’ve ever dreamed a kitchenaid would be — like a second set of hands that’s better than my own. Ok, there are certain things my digits can do that a kitchenaid can’t.

If you think of any, let me know.

{ 0 comments }

Butternut Squash and Creamed-Spinach Gratin

This dish is rich and satisfying without being super heavy. The butternut squash lends sweetness, while Parmesan cheese gives it a salty, crunchy bite. It’s also good-to-go for gluten-free folks.

Butternut Squash and Creamed-Spinach Gratin
adapted from Gourmet

3 pounds fresh spinach, stems discarded, or 3 (10-ounce) packages frozen leaf spinach, thawed
5 tablespoons unsalted butter plus additional for greasing pan
3/4 cup finely chopped onion (1 small)
3 garlic cloves, minced
1 1/2 teaspoons salt
3/4 teaspoon black pepper
Rounded 1/4 teaspoon freshly grated nutmeg
1 cup heavy cream
4 pounds butternut squash (2 large), peeled, quartered, and seeded
2/3 cup grated Parmesan cheese

If using fresh spinach, bring 1 inch water to a boil in a 6- to 8-quart pot over high heat. Add spinach, a few handfuls at a time, and cook, turning with tongs, until wilted, 3 to 5 minutes. Drain in a colander and rinse under cold water.

Thoroughly squeeze cooked fresh or thawed frozen spinach in small handfuls to remove excess moisture, then coarsely chop and transfer to a bowl.

Melt 3 tablespoons butter in an 8-inch heavy skillet over moderately low heat, then cook onion and garlic, stirring, until softened, 3 to 5 minutes. Add onion mixture to spinach along with salt, pepper, nutmeg, and cream and stir to combine.

Put oven rack in upper third of oven and preheat oven to 400°F. Butter a 3-quart shallow baking dish (13 by 9 inches; not glass).

Cut squash to separate bulb section from solid neck section, then cut pieces lengthwise into 1/8-inch-thick slices with slicer or sharp knife (with knife, slices will be slightly thicker — which is fine).

Layer squash and spinach mixture in baking dish, using about one fifth of squash and one fourth of spinach for each layer, beginning and ending with squash. Sprinkle top layer of squash evenly with cheese and dot with remaining 2 tablespoons butter, then cover directly with a sheet of parchment or wax paper. Bake until squash is tender and filling is bubbling, 25 to 30 minutes. Remove paper and bake gratin until browned in spots, 10 to 15 minutes, or broil 3 inches from heat, 2 to 3 minutes.

{ 0 comments }

Eggplant Involtini with Feta

This dish is a classic in our house: I love serving it to company or just popping a couple from the fridge into the microwave for a last-minute dinner alone. It’s a great alternative to lasagna, and gluten-free to boot.

Eggplant Involtini with Feta
adapted from Nigella Lawon

2-3 large eggplants, cut lengthwise in thin slices
3 cups (about 1 jar) tomato sauce
2 cups crumbled feta cheese plus extra for topping
1 cup grated parmesan plus extra for topping
1/2 cup walnuts, finely chopped
1/2 cup raisins, soaked in hot water for 10 minutes (optional)
1/2 cup black or kalamata olives, sliced
4 tbsp olive oil
1 garlic clove, crushed or finely chopped
zest from 1 lemon
a good pinch of dried mint
2 Tbsp parsley
1 egg

Brush the eggplant slices on both sides with olive oil and grill or roast them in a 400-degree oven until soft, about 10 minutes per side.

Mix all filling ingredients in a large bowl and stir to combine. Put about a tablespoon of filling on each eggplant slice and roll it up firmly. Use a toothpick to hold in place, or just ensure that the edge is tucked underneath the roll to prevent it from coming undone.

Layer the slices in a 9×13 dish, and cover with tomato sauce. Top with any remaining filling, or extra cheese if you have. Bake at 375 degrees for 25-30 minutes. The involtini should be served warm (lukewarm according to Nigella, but I prefer them warm).

{ 1 comment }

Crisp Potato Eggplant Tart

This is a dead-simple dish that can serve as a side to a good steak, or as a vegetarian main dish. It’s not too difficult to make, and the payoff is worth the trouble.

Crisp Potato Eggplant Tart
adapted from Great American Food, by Charlie Palmer with Judith Choate

2 1/4 cups finely diced, peeled eggplant
1 teaspoon coarse salt plus more to taste
1/4 cup plus 2 tablespoons safflower oil
3 tablespoons minced shallots
4 large Idaho potatoes
Pepper
1/4 cup (1/2 stick) unsalted butter

Place eggplant in a nonreactive bowl. Toss with 1 teaspoon of salt and allow to sit for 20 minutes. Remove to a clean kitchen towel and tightly twist to squeeze out all moisture. Set aside.

Heat 2 tablespoons of oil in a medium sauté pan over medium heat. Add the eggplant and shallots and sauté for about 6 minutes, or until very tender. Remove from heat and set aside.

Peel potatoes. Using a hand grater or mandoline, shred potatoes into a clean kitchen towel. Tightly twist to squeeze out as much moisture as possible.

Preheat oven to 375°F.

Heat remaining 1/4 cup of oil in a 9-inch ovenproof, nonstick sauté pan over medium heat. Using a spatula, evenly press half of the potatoes into the pan. Season to taste with salt and pepper. Spread the reserved eggplant over the top. Pat remaining potatoes evenly over the eggplant. Again, season to taste with salt and pepper. Cook for about 10 minutes, or until bottom is golden. Carefully turn and dab the crust with bits of butter. Cook for about 5 minutes, or until bottom begins to crisp. Place in the preheated oven and bake for 25 minutes, or until potatoes are cooked and tart is golden and crisp. Remove from oven and allow to rest for 5 minutes. Using a sharp serrated knife, cut into 6 wedges and serve immediately.

{ 1 comment }

Spinach and Roasted Red Pepper Gratin

This rich, flavorful gratin dish makes a fantastic light supper or lunch main course. It also happens to be gluten-free and kosher for passover — go figure.

Spinach and Roasted Red Pepper Gratin
adapted from Epicurious

4 10-ounce bags fresh spinach leaves
3 red bell peppers
1 1/2 tablespoons butter
1 1/2 tablespoons olive oil
3 medium leeks (white and pale green parts only), thinly sliced (about 3 cups)
1 large shallot, chopped (about 1/4 cup)
3 garlic cloves, minced
1 cup whipping cream
4 large eggs
1 cup part-skim ricotta cheese
1/2 cup grated Swiss cheese
1/4 cup grated Parmesan cheese
1 1/2 teaspoons salt
1/2 teaspoon ground black pepper

Heat large deep nonstick skillet over medium-high heat. Working in batches (about 10 cups at a time), sauté fresh spinach in dry skillet until bright green and wilted, about 2 minutes per batch. Transfer spinach to strainer. Squeeze spinach dry; roll in kitchen towel to remove excess water.

Char peppers directly over gas flame or in broiler until blackened on all sides. Enclose in paper bag; let stand 10 minutes. Peel, seed, and slice peppers into 1/4-inch-wide strips.

Melt butter with oil in heavy large skillet over medium heat. Add leeks, shallot, and garlic; cook until soft, about 5 minutes. Remove from heat. Whisk cream and eggs in large bowl to blend. Whisk in all cheeses, salt, and pepper. Stir in spinach, leek mixture, and 2/3 of roasted red peppers (reserve 1/3 of peppers for topping). (Can be prepared 1 day ahead. Cover and refrigerate.)

Preheat oven to 350°F. Generously butter 13x9x2-inch baking dish. Transfer spinach mixture to prepared dish. Bake gratin until knife inserted into center comes out clean, about 50 minutes. Arrange remaining red pepper strips decoratively atop gratin and serve.

{ 1 comment }